Introduction
If you happen to do data analysis, data exploration, machine learning, or deep learning (anything that’s data science) and you are a Pythonistas, chances are you are using Jupyter Notebook/Lab for your daily routines. Why? Because it’s convenient, it’s an all-in-one IDE that you can use to take notes, make experiments, test out ideas, visualize results, and complete your product. It’s that great that we all love Jupyter Notebook/Lab.
This page isn’t about telling all about Jupyter Lab as it is beyond my own knowledge and I’m still young and eager to learn more about it. However, this page is more about key things that help you kick start with Jupyter Lab for your Data Science journey. Some tips/tricks will be said here than there, how to use key things and get yourself comfortable with Jupyter Lab, from that on, you are the master of your journey. Let’s kick start! Our next coming sessions:
1. Installation and setup environment
2. Intermediate Usage of Jupyter Lab
3. Advanced Usage of Jupyter Lab
Installation and setup environment
There are a number of ways to install Python and setup environments, such as:
2. Mamba
6. Mini-forge
and the list goes on… Of all these well-known ways, Anaconda and Miniconda seem very popular among data science guys. This page will be using Miniconda as the starting point. Anaconda is fine and there are many packages are installed along the way when you are installing Anaconda, however, the down-size is that it will take up a lot of space of your computer’s disk with packages that you might not use at all.
♦ Download
You can download Miniconda here. On the page, you can download installers or check how-to-install for the OS you have. Once you are done with downloading and installing Miniconda let’s get going with creating your data science environment.
♦ Creating environment
Since Python is a very inherent language in which packages have a dependency on other packages, thus, there will be conflicts between versions of packages. To make life easier, we need to create an environment where our packages can live together in harmony and when we introduce new packages to the environment, we know that they can or cannot enter. This is when conda helps us manage packages and make sure that once packages are installed, no further conflicts occur. In your miniconda3 folder, this is where all your environments will rest:
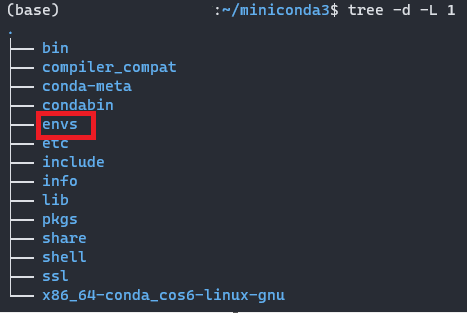
There are 2 main ways to create an environment:
- Using command lines with manually inputted packages (find detail guidelines here)
- Using input files (detail guidelines here)
Ideally, it’s better to use an input file because we don’t have to remember all packages we need to install in an environment and we can create a template of this file for every time we want to create a new environment. Such as this environment.yml file:
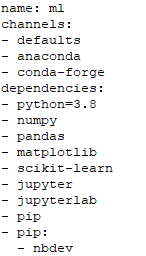
This you can see there 3 components of the file:
- name: name of your environment
- channels: list of all channels that your packages are downloaded from (for each package, you can Cốc Cốc it: conda install package_name)

and you can see the channel it belongs to:
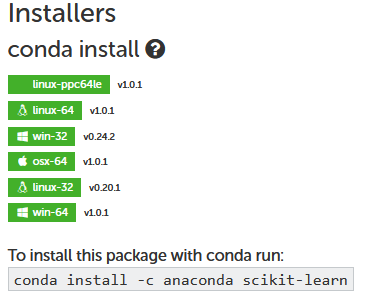
- dependencies: list of packages you want to install and python version as well. In the case that your packages are not in the Conda list, you have to use pip to install it, if so, you need to add pip under dependencies, and under pip, you add the package you want to add. Here it’s nbdev I want to add here but it’s not listed in Anaconda. nbdev is very important and we’ll talk later about it. Remember to add Jupyter and Jupyterlab to your dependencies to be able to use Jupyter notebook/lab later.
To check all available environments you have, just type:
| 1 conda env list |

To use/activate/enter the environment, just type:
| 1 (base):~$ conda activate ml |
| 2 (ml):~$ |
To stop using the environment, just type:
| 1 (ml):~$ conda deactivate ml |
| 2 (base):~$ |
♦ Setting up Jupyter Server
If you are working on a remote server, you need to set up your Jupyter server so that you can work remotely on a web browser. If you are working on a local device, you can skip this part.
For detail of what you need to do, you can visit this page, there are a few things you need to do:
- Create notebook configuration file: jupyter_notebook_config.py
- Setup password, it will be written to: jupyter_notebook_config.json
- Create SSL for encrypted communication
- Choose a port for your notebook
Once done, you are good to go.
Intermediate Usage of Jupyter Lab
Since the success of Jupyter Notebook, the Jupyter team decided to develop Jupyter Lab, which is more user-friendly to manage and control all notebooks and other things as well.
I’m going to use ml environment as the file above:
| 1 (base):~$ conda activate ml |
| 2 (ml):~$ jupyter lab |
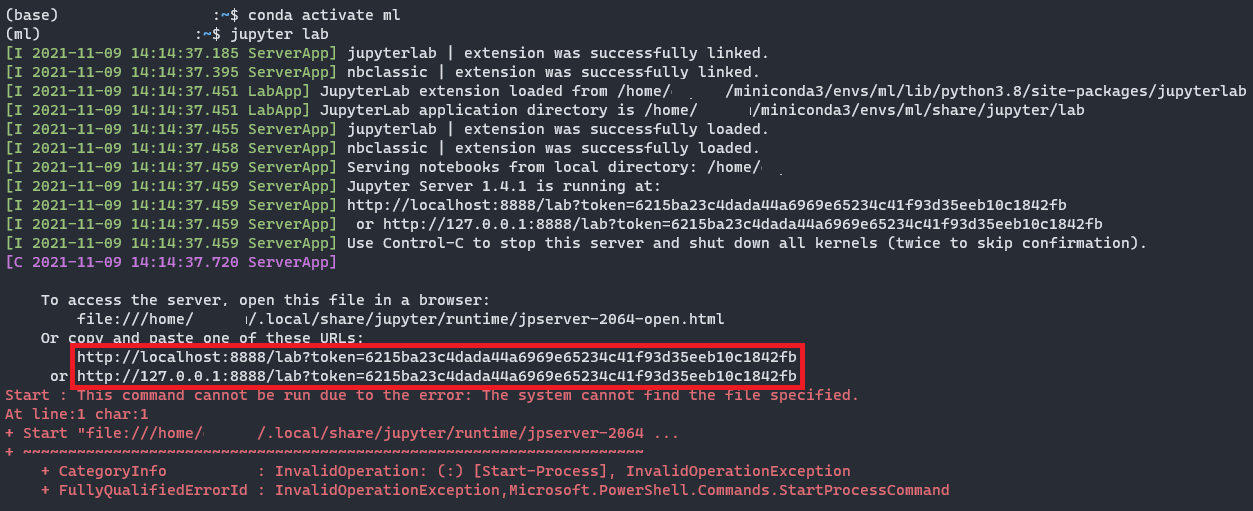
Ctrl + clicking on one of the two links and you see a web browser opening for you, that is where you will use Python to do your data science projects. Yahh!
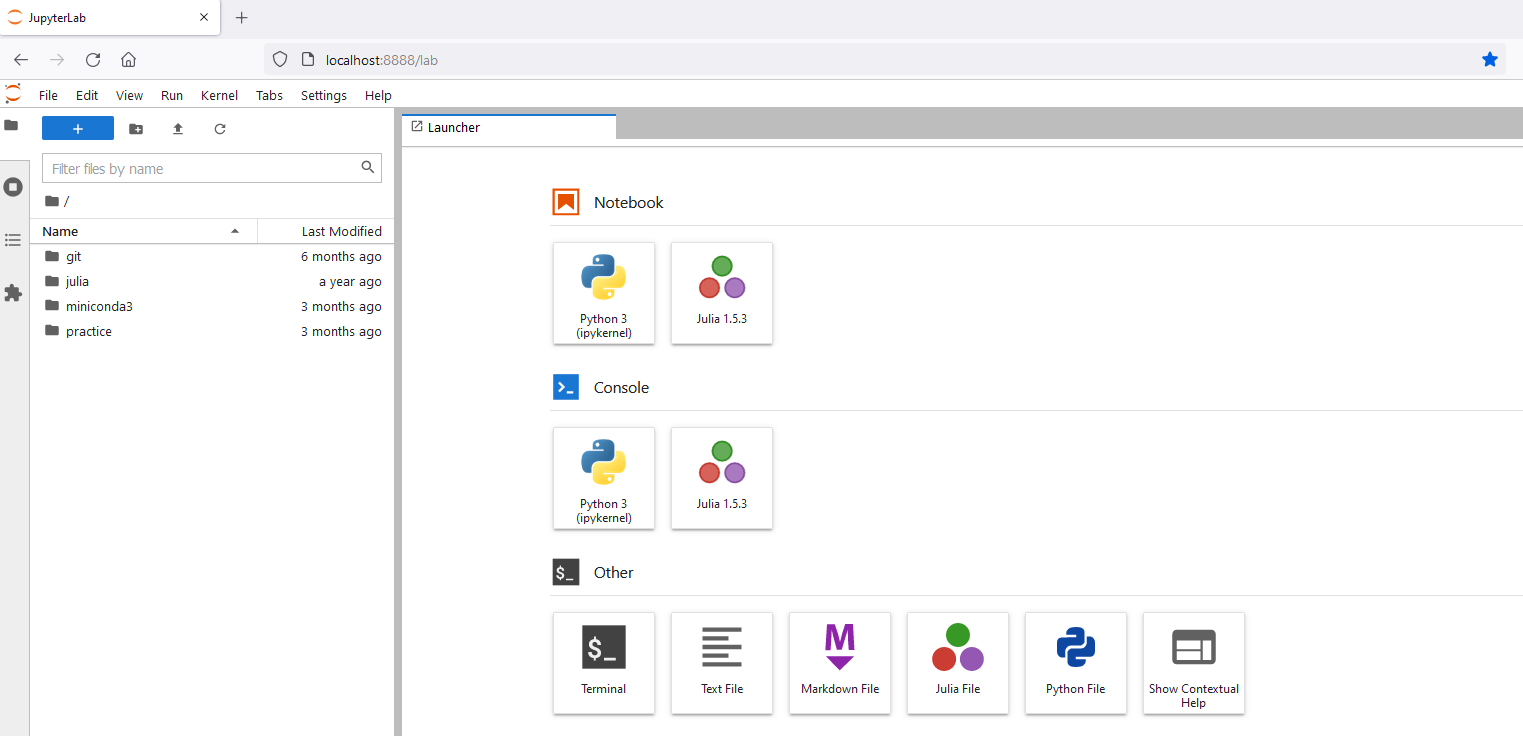
This is what you’ll see:
♦ Creating new things
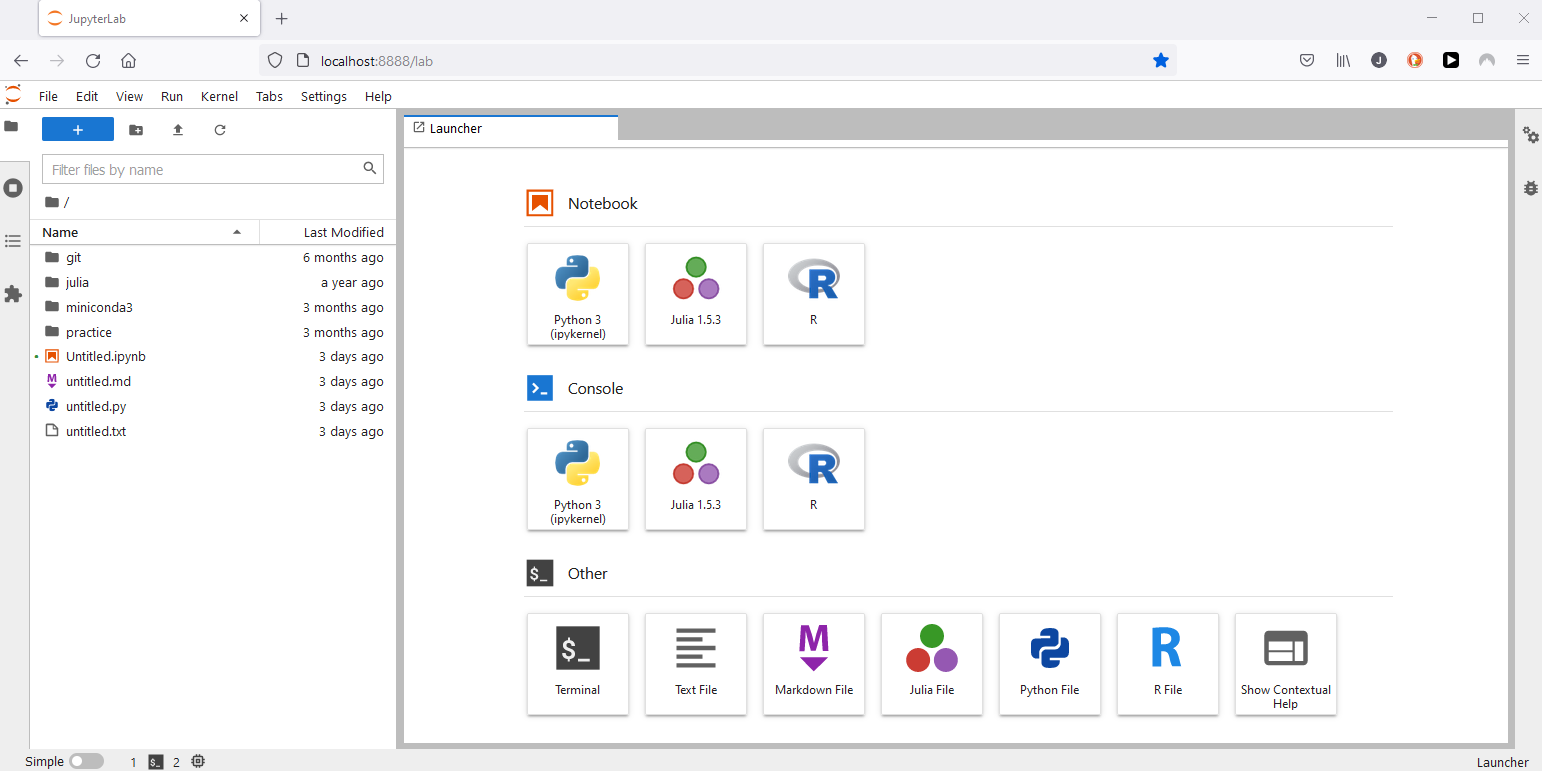
On the launcher tab, you have Notebook; Console; Other to choose what you want to create.
For Notebook, you have Python 3 (here on the demonstration, we also have Julia and R, however, this is because they are installed by the author. Note that Jupyter Notebook/Lab can support Python, Julia, R for data science. For more information on how to install Julia & use Julia on Jupyter, click here, install R and use R on Jupyter, click here), clicking on that, you have a new Python Notebook.
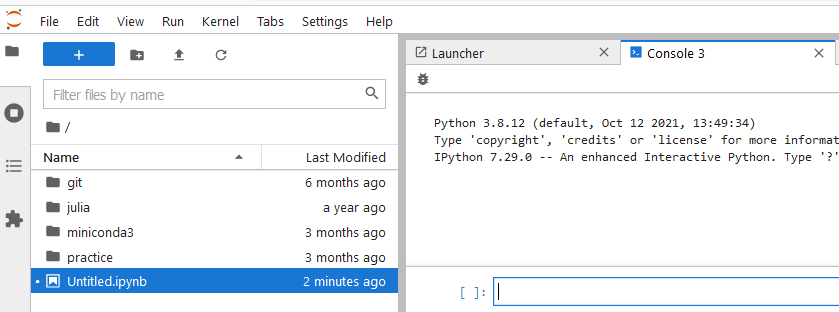
Same for Console, you will have a new Python Console.
On Others, you can make a terminal, file.txt, file.py, file.md, and this is what you get from all this:

You can have all windows in sight to play with if you want.
♦ Sidebars
You can have sidebars on both sides left (LHS) or right (RHS). Most of the things appear on LHS sidebar, including (from top to bottom):
- File browser:
You have: New Launcher; New Folder; Upload Files; Refresh Files
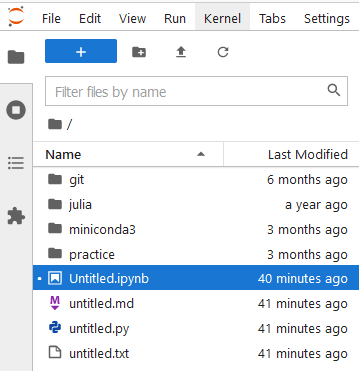
So you can add new notebooks; new folders; upload files or refresh the current working directory
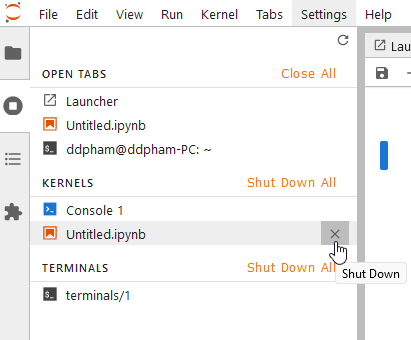
- Running terminals and kernels:
You can see any terminals, consoles, or notebooks that that running at the moment. Thus, you can shut down any of them or all if you want.
- Table of contents:
You can see the table of contents with all notebooks that you create with bookmarking as headers.
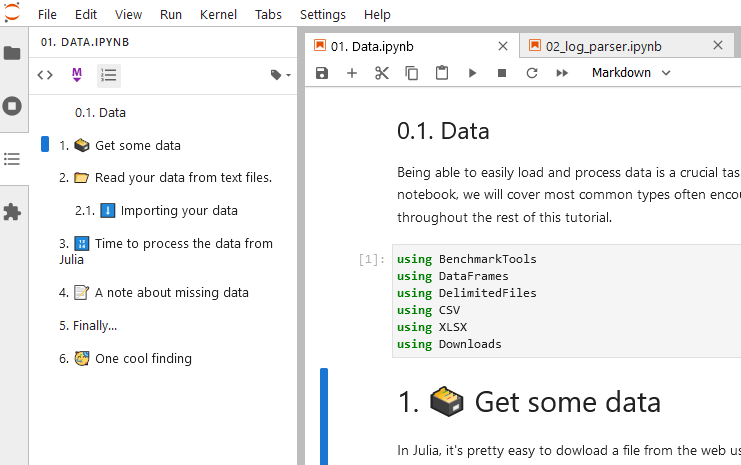
Previously, Table of Contents is one of the extensions of Jupyter, however, after seeing its usefulness and its impact on the community, the team made it the default feature of Jupyter.
- Extensions:
Extensions by default are not enabled for you. To enable the extension, you have to go to settings → Enable Extension Manager
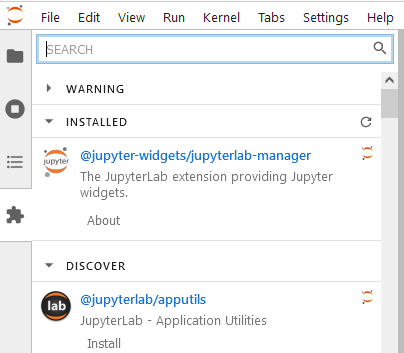
This is where you can search and add new cool things to your notebook, just to aid you a little bit here and there. More to come in the next session!
- Debug: on the RHS sidebar, there is also a new cool thing just added here: The debug that helps you check and debug codes when developing your apps or packages
Previously, debug was also an extension like Table of Content (TOC), however, it becomes a default feature of Jupyter now.
♦ Extensions
Extension is a cool part of Jupyter Lab that we should all know and find a list of things that are convenient and helpful for us. Normally, you can just simply search names of the extensions you want on the extension sidebar:
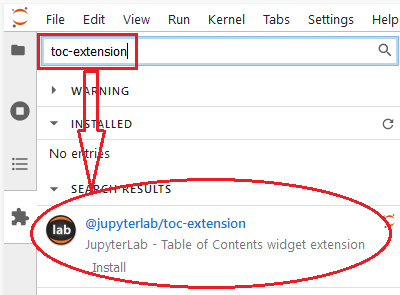
then hit Install, Jupyter Lab will install the extension and rebuild the Jupyter Lab’s layout for you. Sometimes, it will popup a bar saying that you need to install Nodejs beforehand so you don’t have to worry about it:
| 1 conda install -c conda-forge nodejs |

For more information about extensions setup, you can find it here. One important note is that whenever you want to install any extension, make sure that it’s a trustworthy extension that doesn’t harm you. How to know it? The simple rule is that it should be from a well-known organization (JupyterLab, for example), or the project on GitHub gets a lot of stars or forks.
There are tons of extensions that you might find interesting, in this part, I will briefly go through 3 extensions that I find extremely helpful for most data science enthusiasts.
- git
At times, we’ll do git in a project that we participate in and chances are we’ll have to commit some code to it, whether that is a notebook, a document, or some files. And like many other IDE tools that support git control, git extension on Jupyter Lab also does the same. This extension is developed by the JupyterLab team.
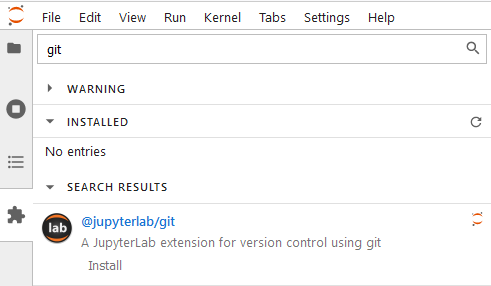
or you can use the command:
| 1 conda install -c conda-forge jupyterlab jupyterlab-git |
And there you have it:
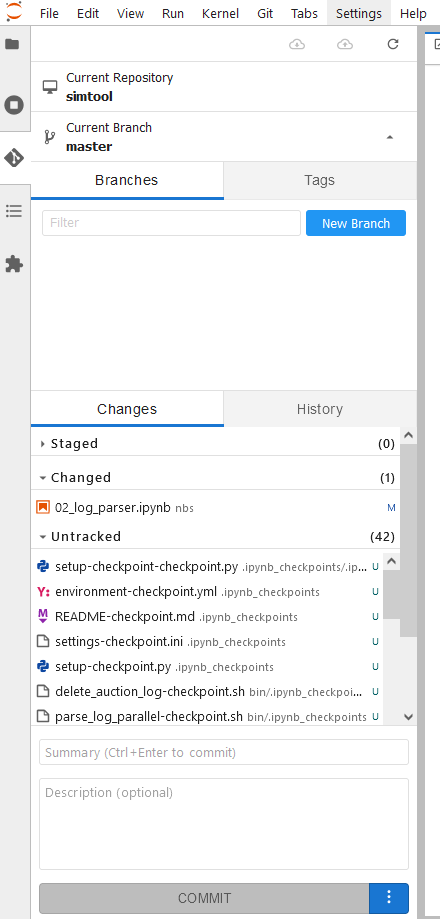
If you want to know more about git extension, check out the git-hub page, and if you want to learn a bit about git on jupyter, you can see Introduction to Using Git in Jupyter.
- Google Drive
Next is the google-drive extension, which is also developed by the JupyterLab team. If your company uses a google account, you can benefit from using google-drive too.
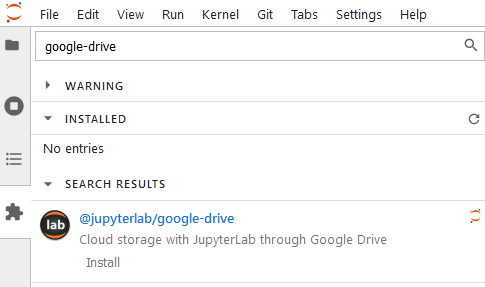
| 1 jupyter labextension install @jupyterlab/google-drive |
- Templates
Templates are such a cool extension that allows forming your notebook templates for different purposes, and when you want to create a new one, you can reload these templates instead of creating your new ones. This is developed by the JPMorganChase team.
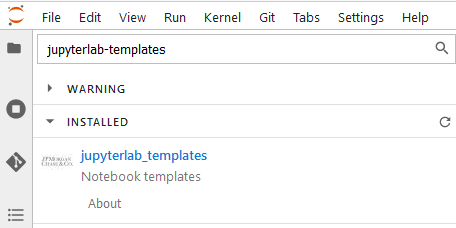
Or you can install with the command:
| 1 pip install jupyterlab_templates |
| 2 jupyter labextension install jupyterlab_templates |
Once you installed the extension, you get a Template under your Notebook.

Double click on it, you can have a list of templates you have.
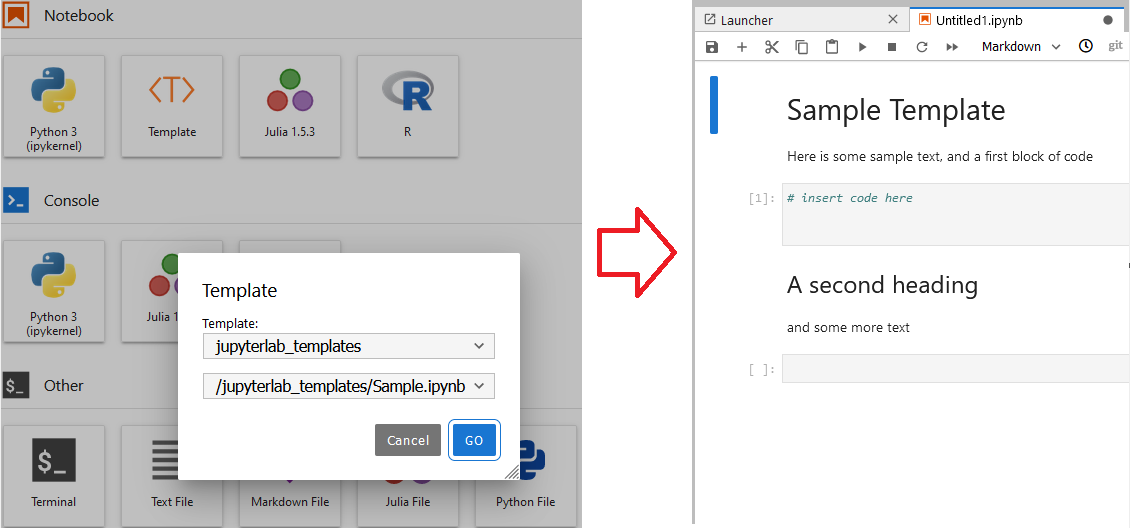
In the beginning, you have one sample template made by the team. You can create your own to add there. More of this will come in the next session.
Other than these 3 extensions, depending on your work, ecosystem, you can add on for a more convenient, and effective workflow. Such as:
- dask-labextension to manage your Dask clusters,
- TabNine for code auto-completion, or
- JupyterLab System Monitor to see system usage from your notebook.
And the list goes on…
Advanced Usage of Jupyter Lab
♦ Managing working directory and notebooks
Depending on how you store all your work on GitHub/GitLab or on your local device, you can adjust a little bit to fit your own nature of work. This is mainly about how you can manage your local working directory and notebooks so that you can find yourself effective and efficient while doing your data science tasks and projects. If you happen to manage your own git repository or your team’s git repository is organized by members of your team, you can still apply the same approach. The key goal of managing your working directory and notebooks is that:
You should design your working directory, notebooks so that you can re-use your work as much as you can.
Why? Because your work at some point has its own repetitions, such as:
- Downloading data: same data sources, same methods of downloading them, maybe queries are different, thus QUERY is a variable, whilst others are constant.
- Loading data: Save data formats, filenames, and a number of columns can be different, however, data formats are the same (such as csv, json, txt, tar.gz, parquet…).
- Aggregating and visualizing data: same data aggregation by certain dimensions, and same visualizations. Data and dimension names can be different, however, the rest are the same.
- Same characteristics: need to do parallelism and/or concurrency, certain preprocessed data transformations.
- Same workflow: certain experiments then need to be put into pipelines, the order of things can be different, however, the pipeline is the same.
These things can’t be clear when you first start your job, and over time, they will be more appealing to you as you recognize patterns of your work and your tasks. Once you reckon it, just make this happen. Let’s go over a couple of things so we can see it clearer. Of course, things can be different for you, though, the spirit should be the same!
Downloading Data
There are two types of downloading data that you most likely use for your tasks or projects:
- Downloading data to local/shared storage
- Download data from source to the current working environment (Python/R/Julia Kernel) for analysis
The first type is mostly done outside of Notebook due to the large size of data (many dates or the size of 1 day is already large). In this case, you can use command-line or other ETL tools to help you.
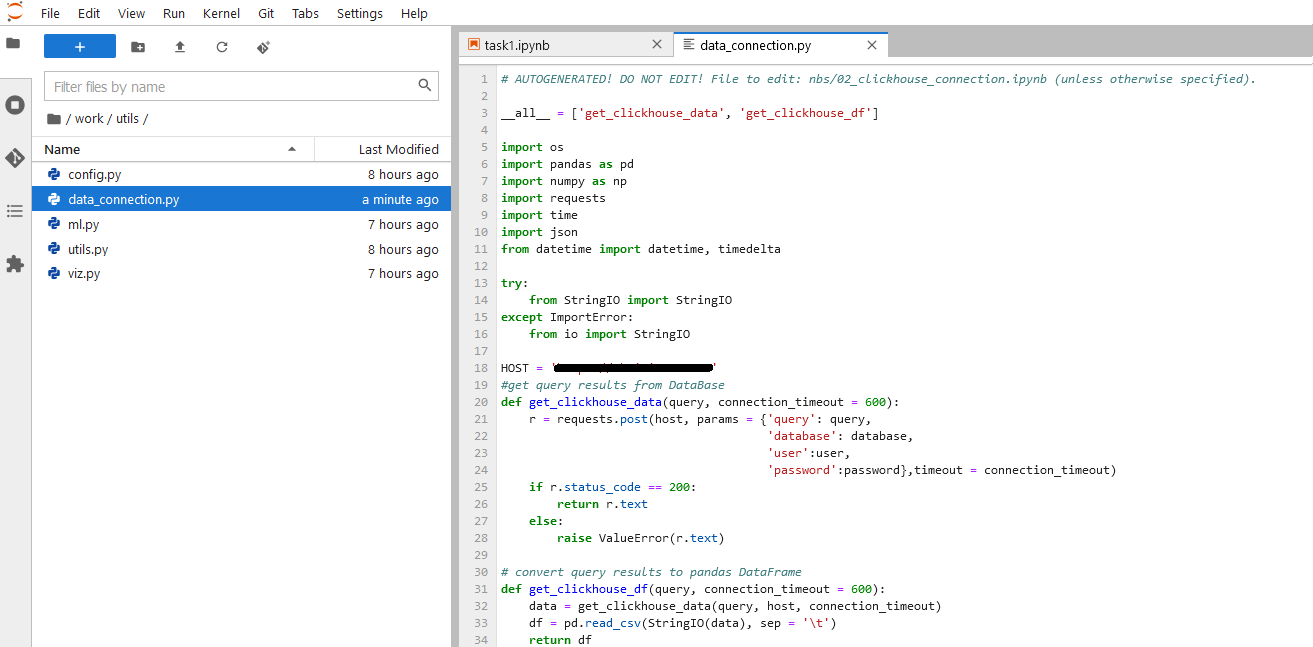
For the second type, you have some packages that help you connect to the data sources you want to connect from either Python, R or Julia, you then set up the connection and use whatever queries you need to collect data to your current working kernel. For example, you have ClickHouse as your data source, then you can create ClickHouse connections:
- You would want to create a module for data connection data_connection.py under a folder where you keep all our convenient modules by subjects (such as config.py; utils; …):
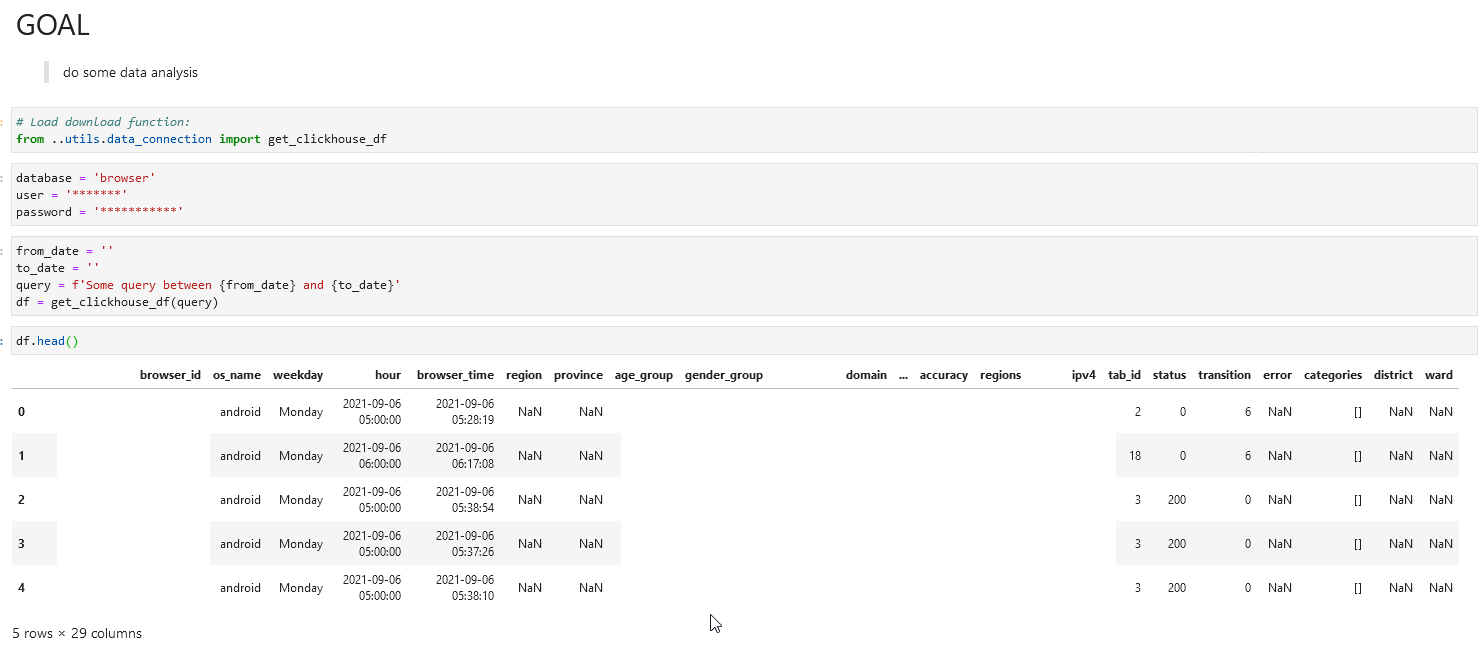
- Then for your new notebook, you don’t have to import all the things again, except the build-in function/methods you want to use. You can even put your user/password to the config file or environment variables so you don’t have to type them again, and they are safe too.
Same characteristics
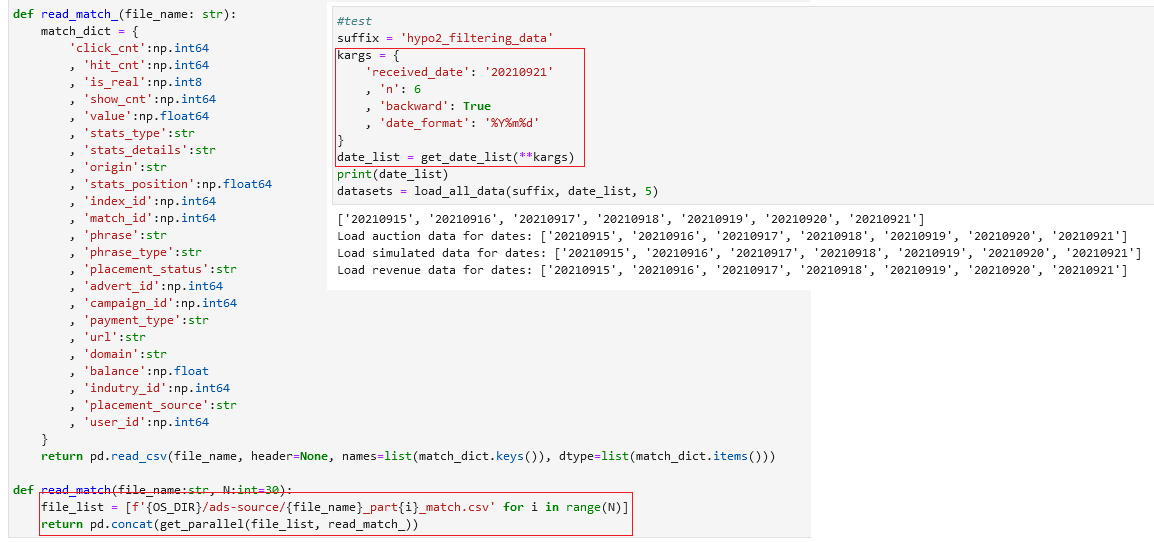
Many times you want to fasten your tasks with some parallelism along the way. Instead of a for loop, I like to use multi-threading so that I can speed up the task. Sometimes, for some analysis, I want to set the RAM limit to the notebook so it doesn’t go overboard and kill the server, I can create a custom function to do that too. Or I want to have a custom function that I can select a list of dates starting from some date, backward or forward. All of these convenient functions, I can put into a utils.py module and load it every time I need:
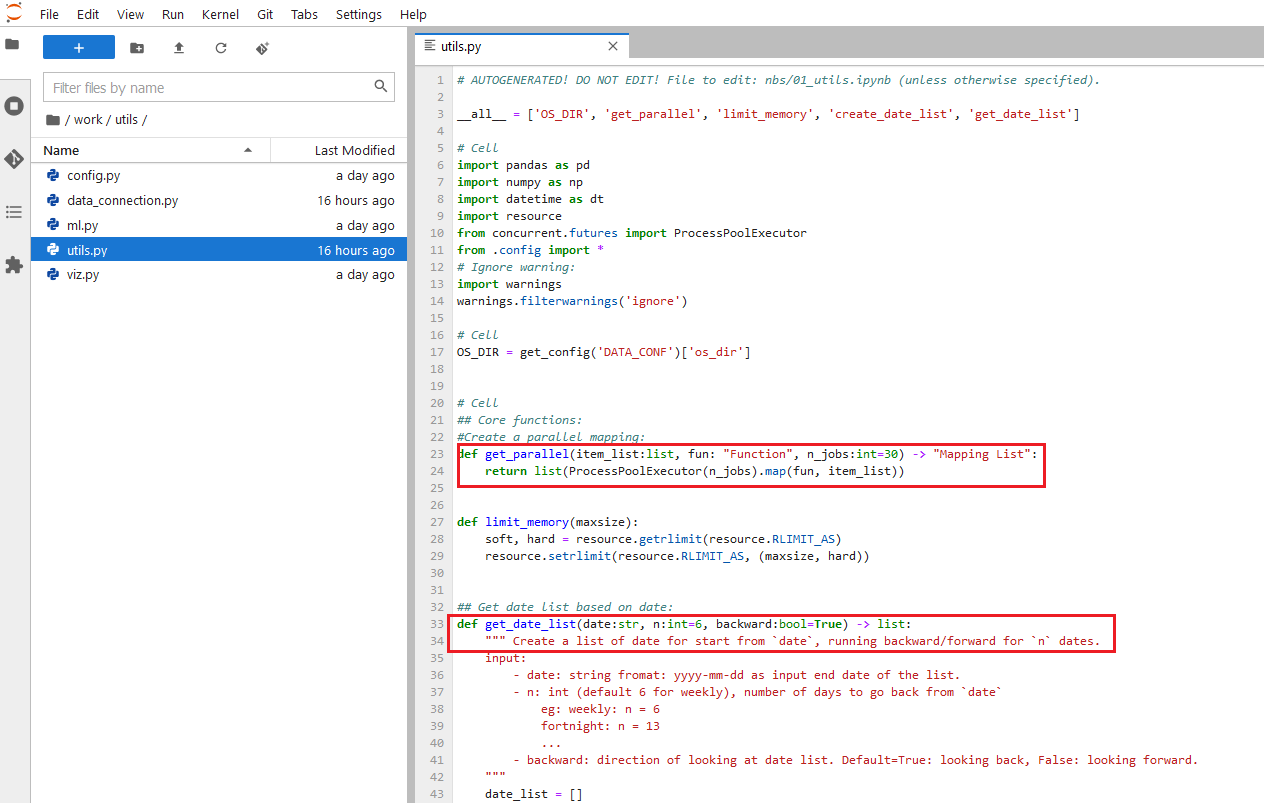
Then use it when I need:
Managing directory
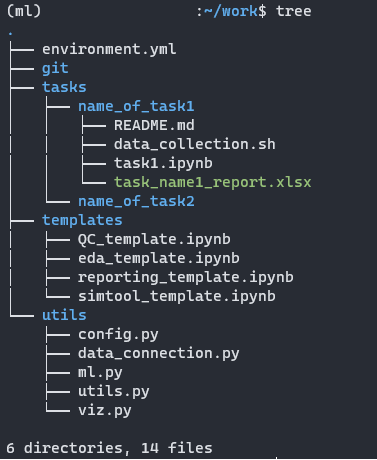
Normally, you can have 4 main directories in your work folder:
1. tasks: where you store all tasks you’re assigned to or project if they are not on Git, if they do, you can have.
2. git: store all your repositories.
3. templates: store all templates notebooks you could re-use over time.
4. utils: all convenient modules you can reuse as well.
You can also have other directories as well such as data, reports, and so on, depending on the nature of your work that you need to store them on your personal device, else just keep them where they belong and only keep the logical parts (Queries, …) to tasks it’s assigned.
Thus, from any task under the tasks directory, you can create notebooks and call either templates or modules in utils to re-use them. Do make sure that anything that is reusable stored somewhere you can recall easily.
Under the name_of_task1 directory, you can have anything from notebooks, README.md, environment.yml, command-line scripts, reports… to serve your task. If you have additional data to it, you can create sub-folder data for more convenience. Once you’re done with your task, you can clear up the data and only keep the logic/codes/SQL queries to reproduce it, anything will be written in README.md.
Create template notebooks
Over time, you’ll see that there are many tasks doing the same thing, only in different contexts. Thus, it’s easy to understand that you’d want to reuse previous work with the same format and same flow. Initially, you’d copy-paste codes from notebooks to notebooks, and this is a bad practice. Instead, create notebook templates of these tasks and they will come in very handy and make your life easier and work can be done a bit faster.
To do this, we’ll have to use jupyter-templates that were developed by the JPMorganChase team from the previous session about Extensions.
We need to follow the steps below:
1. Create jupyter_notebook_config.py, using this command:
| 1 jupyter notebook --generate-config |
Then you’ll have jupyter_notebok_config.py under /home/your_username/.jupyter/ if you are using Linux; or C:\Users\username\.jupyter\ if you are using Windows.
2. Add the following codes to jupyter_notebok_config.py:
| 1 c.JupyterLabTemplates.template_dirs = ['list', 'of', 'template', 'directories'] |
| 2 c.JupyterLabTemplates.include_default = True |
| 3 c.JupyterLabTemplates.include_core_paths = True |
Remember that template_dirs must be the parent folder of the folder where you store all your templates. In my case, it is:
| 1 c.JupyterLabTemplates.template_dirs = ['/home/my_username/work'] |
| 2 c.JupyterLabTemplates.include_default = True |
| 3 c.JupyterLabTemplates.include_core_paths = True |
Since I have only one folder for templates and templates folder is under the work folder.
3. Refresh JupyterLab and ready to use
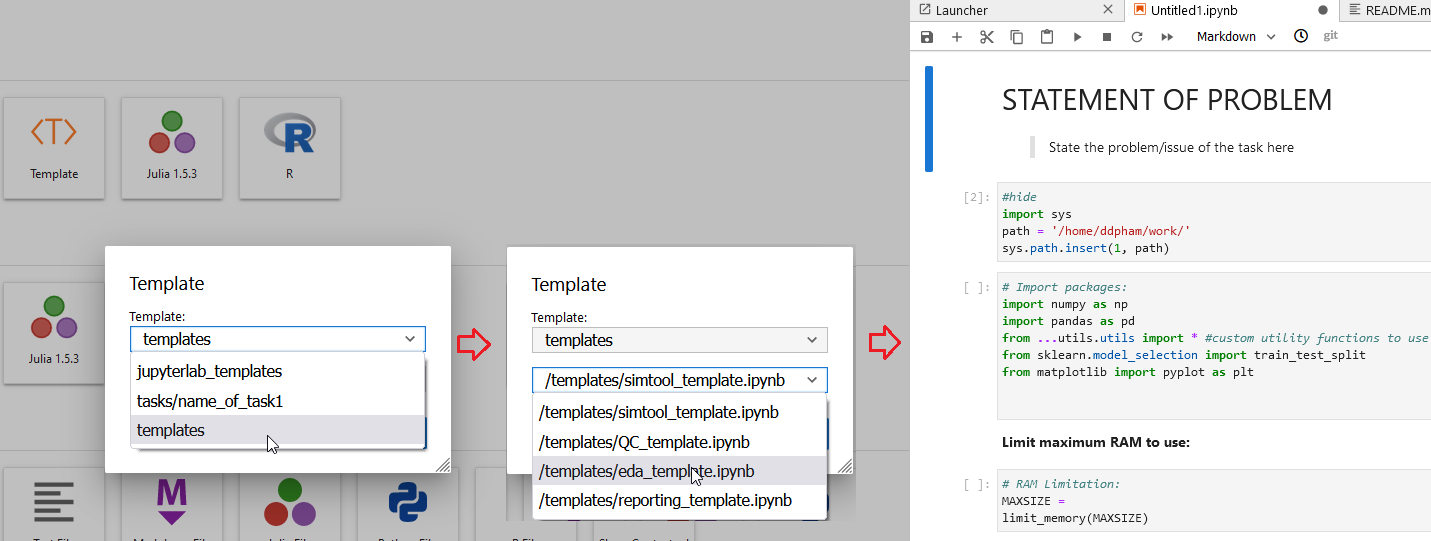
Here you can see that now I can choose any sub-folders of work as to where I want to select my templates, obviously, if you’re doing the same work with different data, or doing slides for different business teams, you can re-use your previous work as well.
Next level with nbdev
nbdev is a Python library that was developed by fastai team, it helps you develop a new Python library/package using Jupyter Notebook/Lab. The motivation for this library is to create a literate programming environment that was envisioned by Donald Knuth in 1983. Many developers who have experience with other IDE such as PyCharm, Spyder, VS-Code, and so on have felt quite a bitter taste when it comes to Jupyter Notebook/Lab. If you’re one of them, please watch this first before you move on:
Youtube Video: I Like Notebooks
If you’re not convinced just yet, then mostly, you’re not a notebook kind of guy/girl and it’s okay, you can move on with your current IDE.
This is some sum up of what we can do with nbdev
- Create your git repository and create your Python library that contains codes, docs, and tests at the same place. You can find a template here.
- nbdev also can handle all git things.
- You can even write a book with Notebook and nbdev. The famous book “Deep Learning for Coders with fastai and PyTorch: AI Applications Without a Ph.D. “ was written by the authors of nbdev.
For a tutorial of nbdev, you can visit a minimum tutorial to get a kick-start with it.
This is our work using nbdev here at Cốc Cốc:
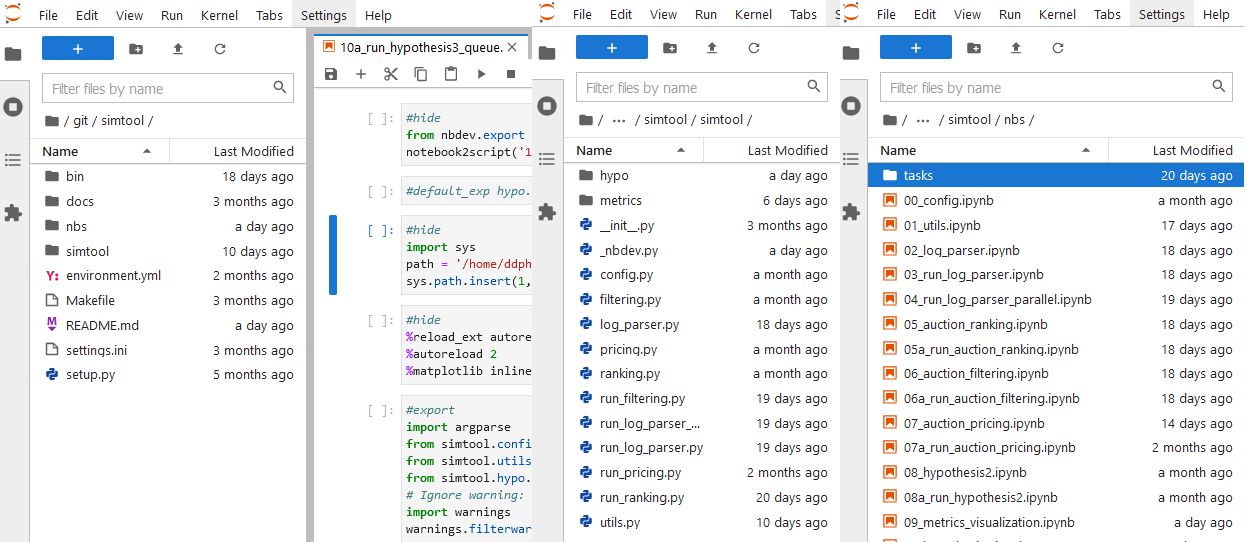
where:
- nbs is where all the notebooks are stored. All notebooks are where you store all your codes, logic, tests, even tutorials of how to use your codes! There you have a literate programming environment!
- docs is where documents of codes are stored and can be read from an URL address you set up.
- simtool contains all modules of the library we developed, it’s the name of the library. All modules are auto-generated from the notebooks in the nbs folder.
- settings.ini & setup.py are things nbdev used to run all things.
Conclusion
So there you go. Now, don’t hesitate to start your Data Science journey with Jupyter Notebook/Lab, over time, you’ll grow into it. One thing that I also like about Notebook is that they’re on a web browser, which is very close to the internet and search engine. If you are a little good with short-keys, you find yourself very fast with a browser tab of Notebook, others for what you find with your problems or to read-up things. Furthermore, you’ll find a bit more focused when you don’t have to switch between applications too much too often while working. Good luck!
***
Cốc Cốc Business Intelligence Department (or BI Team) is where Data Engineers can shine the brightest, by participating in building the Data Management Platform - DMP and in many projects which include storing, analyzing, and using data. As the backbone of Cốc Cốc, this department will deliver statistical analytics and predicting models, creating the base to enhance the company products, or to say:
That’s where the magic happens!
And if our sharing has sparked your way to develop as a Data Scientist, especially in joining a team which help to build better, smarter versions of Cốc Cốc's "Make in Vietnam" products, discover your journey with us right HERE!

